
Understanding the Art and Science of Juvederm Treatment
Juvederm injection technique is the precise method by which healthcare professionals administer hyaluronic acid gel beneath the skin to restore facial volume, smooth wrinkles, and improve contours. Here’s what you need to know:
Core Juvederm Injection Techniques:
- Tunneling – Linear threading of filler along wrinkles or folds
- Serial Puncture – Multiple small injections in a dotted pattern
- Bolus – Single-point volume deposits for targeted areas
- Fanning – Radiating pattern from one entry point
- Crosshatching – Grid-like layering for even distribution
Common Injection Depths:
- Intradermal (within skin layers) – For fine lines and superficial corrections
- Subdermal (beneath skin) – For moderate volume restoration
- Supraperiosteal (above bone) – For deep structural support
Key Equipment:
- Fine-gauge needles (27G-32G) for precision
- TSK STERiGLIDE cannula (25G-27G) for safer, less traumatic delivery
- Pre-mixed lidocaine in Juvederm XC products for comfort
The technique varies based on the treatment area—lips require different approaches than cheeks or jawline—and the specific Juvederm product being used. Proper aspiration before injection and slow, controlled pressure minimize the risk of complications like vascular occlusion.
When patients ask me about facial rejuvenation options, they often wonder what happens during the actual injection process. The truth is, achieving natural-looking results with Juvederm isn’t just about the product itself—it’s about understanding facial anatomy, choosing the right injection plane, and adapting technique to each person’s unique structure.
As Dr. Cheryl Twu, board-certified obstetrician-gynecologist at Wellness OBGYN in Honolulu, I’ve integrated aesthetic medicine into my practice to support women’s confidence and well-being throughout life’s transitions, including mastering the Juvederm injection technique through advanced training in facial anatomy and dermal filler placement. My approach combines evidence-based medicine with personalized care, ensuring each patient understands not just the what, but the how behind their treatment.

Related content about juvederm injection technique:
The Role of Hyaluronic Acid in Facial Rejuvenation
At the heart of every Juvederm product is hyaluronic acid (HA), a remarkable substance that plays a crucial role in maintaining our skin’s youthful appearance. So, what exactly is Juvederm and how does it work?
Juvederm is a gel-based filler primarily composed of hyaluronic acid. Think of HA as nature’s ultimate moisturizer. It’s a sugar that occurs naturally in our dermis, the second layer of skin, and acts like a sponge, attracting and holding vast amounts of water. This innate ability to bind water is what gives our skin its structure, firmness, and volume. It’s like a natural internal plumping agent!
As we age, and due to factors like sun exposure, our body’s natural production of hyaluronic acid decreases. This leads to a loss of volume, resulting in the formation of fine lines, wrinkles, and folds. Juvederm works by replenishing this lost HA, delivering it directly into targeted areas of the skin. Once injected, the gel integrates with your skin’s natural HA, attracting moisture and restoring volume. This effectively plumps up the skin, smoothing out wrinkles and enhancing facial contours for a refreshed, more youthful look.
The beauty of HA fillers like Juvederm is their compatibility with our bodies, minimizing the potential for adverse reactions. Should there ever be a need, HA fillers can also be dissolved with an enzyme called hyaluronidase, offering an added layer of safety and control. You can learn more about how Juvederm works to restore youthful elegance and timeless radiance on our dedicated page: Juvederm. For comprehensive scientific research on Juvederm’s safety and efficacy, you can always refer to reputable sources like the manufacturer’s website: Scientific research on Juvéderm safety.
Mastering the Juvederm Injection Technique for Facial Contouring
The effectiveness and natural appearance of your Juvederm results hinge significantly on the injector’s skill and the specific Juvederm injection technique employed. When we approach facial contouring, it’s not just about filling a line; it’s about understanding the intricate dance of facial anatomy and how each injection contributes to the overall harmony of your features.
Key considerations for an experienced injector like us involve a thorough patient assessment. We evaluate your unique facial structure, skin condition, and the specific concerns you wish to address. Precision is paramount to avoid complications and ensure smooth, natural-looking outcomes. This includes identifying anatomical landmarks and choosing the correct depth and volume for each injection site.
For example, when treating delicate areas like the under-eye (tear trough), extreme care is taken. This area requires a softer, specialized HA filler and meticulous precision to prevent issues like lumpiness or discoloration. Similarly, for areas like the jawline, the goal might be to restore definition or projection, demanding a different approach than, say, plumping the lips.
A personalized consultation is always the first step to discuss your aesthetic goals and determine the best approach. If you’re curious about the investment in your aesthetic journey, you can find more information on our Juvederm Consultation Cost page.
Advanced Juvederm Injection Technique: Needle vs. Cannula
One of the critical decisions an injector makes is whether to use a fine-gauge needle or a cannula for the Juvederm injection technique. Both have their advantages, and the choice often depends on the treatment area, the specific Juvederm product, and the injector’s preference and expertise.
Fine-gauge needles (typically 27G to 32G) offer pinpoint precision, allowing for very controlled, small deposits of filler. They are excellent for superficial corrections and detailed work, such as defining the lip border or addressing very fine lines. However, needles carry a higher risk of bruising and can potentially pierce a blood vessel.
Cannulas, on the other hand, are blunt-tipped, flexible tubes. They are inserted through a small pilot hole made by a needle. Because they are blunt, they tend to push blood vessels aside rather than puncturing them, significantly reducing the risk of bruising and vascular complications. A commonly recommended cannula is the TSK STERiGLIDE®, with sizes like 27-G 1½” for products like Volbella or 25-G 1½” for Volux. Cannulas are often favored for larger areas requiring broader distribution, such as the cheeks or jawline, and for delicate areas like the under-eye.
Regardless of the tool, proper technique is essential. We always aspirate before injecting—that is, we gently pull back on the plunger to ensure the needle or cannula is not in a blood vessel. Injections are performed slowly, with minimal pressure, and we always stop injecting before withdrawing the needle or cannula to prevent leakage or superficial placement. This meticulous approach ensures safety and optimal product placement for beautiful, natural-looking results. For a deeper dive into Juvederm and its applications, explore our guide: Juvederm A Guide to Youthful Elegance and Timeless Radiance.
Specialized Juvederm Injection Technique for Lips and Cheeks
When it comes to enhancing specific facial features like the lips and cheeks, our Juvederm injection technique becomes highly specialized. Each area demands a unique approach to achieve harmonious and natural-looking results.
For lip augmentation, the goals might be to add volume, define the border, correct asymmetry, or smooth vertical lip lines. We often use a combination of techniques:
- Serial Puncture: Multiple small injections along the lip line or within the body of the lip to build volume gradually.
- Fanning: Injecting from a single entry point and fanning out the needle or cannula to distribute filler evenly across a broader area, common for adding overall fullness.
- Crosshatching: A grid-like pattern of injections that provides structural support and even distribution, particularly useful for subtle volume.
- We might use a very fine needle for precise definition of the vermilion border and Cupid’s bow, while a cannula or a slightly larger needle might be used for the main body of the lip. The depth varies from subdermal (for the vermilion body) to intradermal (for the vermilion border and perioral lines).
For cheek improvement, the objective is typically to restore lost volume, lift sagging skin, or create more defined contours. This often involves injecting deeper into the subcutaneous tissue or even supraperiosteally (directly onto the bone) to provide structural support.
- Bolus: Small, precise deposits of filler placed deeply, often near the cheekbone, to create lift and project volume. This is a foundational technique for cheek augmentation.
- Fanning: Similar to lips, fanning can be used to distribute filler broadly across the cheek area, creating a smooth transition and natural contour.
- The choice of product here is crucial, with thicker fillers like Juvederm Voluma often preferred for the cheeks due to their lifting capacity.
After any injection, gentle massage of the treated area is performed to ensure even distribution and integration of the product with the surrounding tissues. This helps achieve a smooth, natural contour and minimizes the risk of lumps. Sometimes, a “touch-up” treatment is needed a few weeks after the initial injection to perfect the results, which you can read more about on our Juvederm Touch Up page.
Navigating the Juvéderm Product Suite
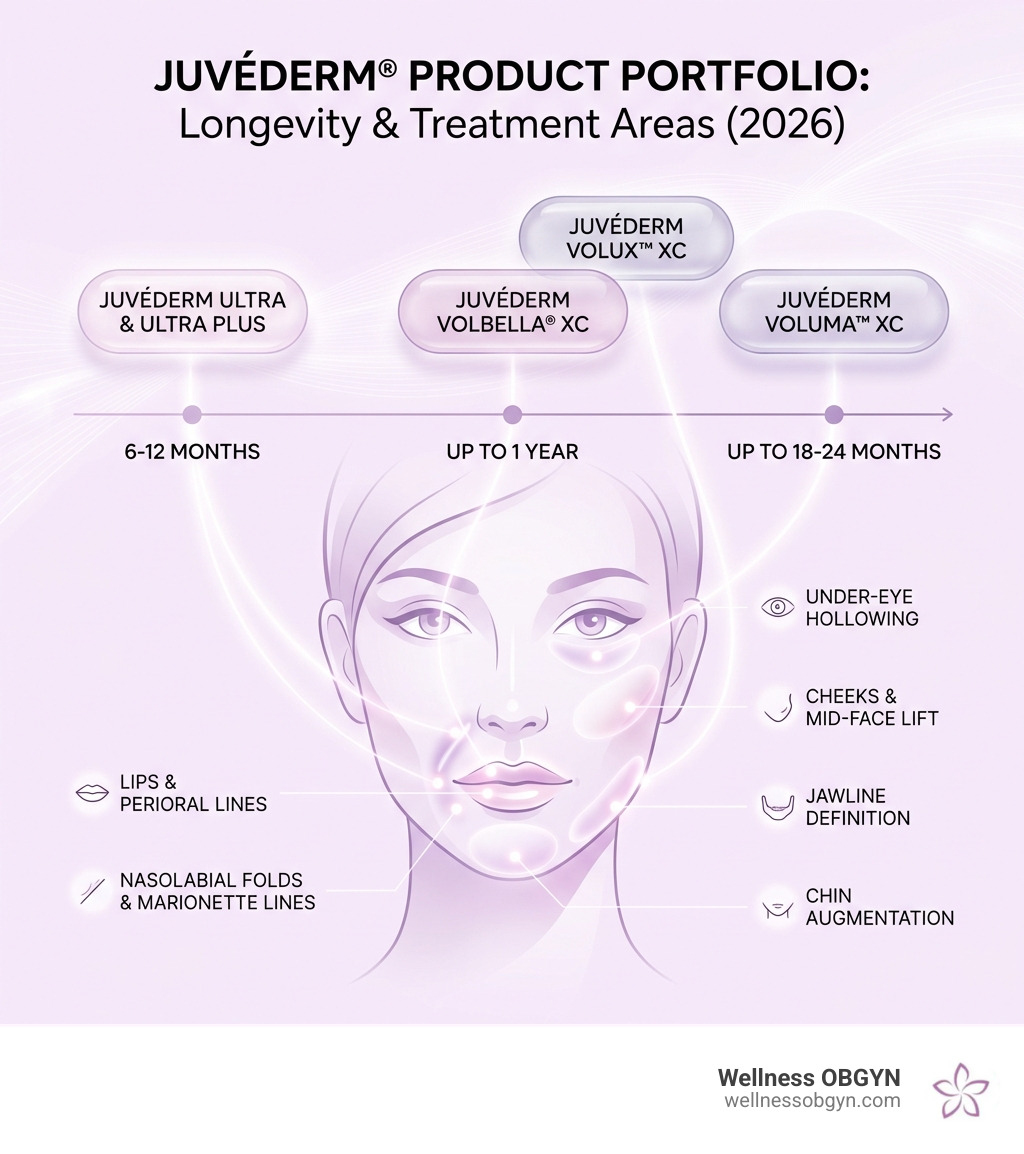
The Juvederm family of fillers is like a well-stocked artist’s palette, with each product designed for specific aesthetic goals and facial areas. Understanding these differences is key to mastering the Juvederm injection technique and achieving optimal results. Most modern Juvederm products use VYCROSS® technology, a special cross-linking process that creates a smoother, more efficient gel that can last longer and integrate seamlessly into the skin.
Here’s a breakdown of the key Juvederm products and their applications:
- Juvéderm Ultra & Ultra Plus: These are versatile fillers used for moderate to severe facial wrinkles and folds, particularly nasolabial folds (the lines from your nose to the corners of your mouth) and marionette lines (lines from the corners of your mouth to your chin). Ultra is suitable for moderate lines, while the thicker Ultra Plus is reserved for deeper folds, offering more significant correction. They typically last around 6 to 12 months.
- Juvéderm Voluma™ XC: This is our go-to for restoring age-related volume loss in the mid-face, specifically the cheeks, and for chin augmentation. It’s a thicker gel designed for deep injection (subcutaneous and/or supraperiosteal) to provide significant lift and contour. Voluma is renowned for its longevity, with results often lasting up to 18 months, and in some cases, even up to two years.
- Juvéderm Volbella® XC: A softer, more pliable gel, Volbella is perfect for subtle lip augmentation, defining the lip border, and correcting perioral rhytids (those pesky lines around the mouth). It’s also FDA-approved for improving infraorbital hollowing (under-eye tear troughs) due to its smooth consistency and minimal water absorption, which reduces the risk of swelling in this delicate area. Results can last for about 1 year.
- Juvéderm Volux™ XC: The newest addition to the family, Volux is specifically designed for improving jawline definition. It’s a robust, cohesive gel that provides strong projection and lift, helping to sculpt a more defined and contoured jawline. Clinical studies showed results lasting up to 1 year, with high patient satisfaction in defining and sculpting the lower face.
Our approach involves selecting the precise product that aligns with your unique anatomy and desired outcome.
Skinvive and the Microdroplet Method
While most Juvederm fillers focus on adding volume, SKINVIVE™ by JUVÉDERM® takes a unique approach, focusing on enhancing skin quality and smoothness. This innovative product is indicated for intradermal injection to improve the skin smoothness of the cheeks in adults over 21. It’s not about volume replacement, but rather about boosting skin hydration and radiance from within.
The Juvederm injection technique for SKINVIVE™ is quite distinct, utilizing a “microdroplet method.” Instead of larger boluses or linear threads, SKINVIVE™ is injected in tiny, precise microdroplets (typically 0.01 mL to 0.05 mL) spaced approximately 0.5 cm to 1 cm apart, directly into the intradermal layer of the skin. This technique ensures even distribution across the cheek area, resulting in improved skin smoothness, hydration, and a healthy glow.
This method requires a meticulous hand and a deep understanding of the skin’s layers to ensure optimal placement and avoid any superficial irregularities. The goal is to improve overall skin quality, making the skin appear more radiant and hydrated, rather than adding bulk. If you’re exploring the costs associated with these treatments, our Juvederm 1 Syringe Cost page can provide some insights.
Ensuring Patient Comfort and Safety
At Wellness OBGYN in Honolulu, your comfort and safety are our highest priorities during any Juvederm injection technique. While injections might sound daunting, we employ several strategies to ensure your experience is as comfortable and risk-free as possible.
Many Juvederm products, like Juvederm XC formulations (e.g., Ultra XC, Voluma XC, Volbella XC, Volux XC, Skinvive XC), already contain a small amount of lidocaine, a local anesthetic, which significantly reduces discomfort during the injection process. Think of it as a built-in numbing agent that starts working almost immediately.
Before we even begin, we typically apply a topical numbing cream to the treatment area, allowing it to take effect for 10-15 minutes. For certain sensitive areas or if you have a lower pain threshold, we can also use ice packs or, in some cases, nerve blocks to further improve comfort. Our team often jokes that patients “just absolutely love the taste of this stuff” (referring to the numbing cream), making the experience surprisingly pleasant!
Despite our best efforts, some minor discomfort and temporary side effects are normal. These are often referred to as Injection Site Responses (ISRs) and can include:
- Redness
- Pain or tenderness
- Firmness
- Swelling
- Lumps or bumps
- Bruising
- Itching
- Discoloration
The majority of these ISRs are mild to moderate and typically resolve within a few days to two weeks. For instance, in clinical studies for JUVÉDERM® VOLUX™ XC, the majority of ISRs were mild or moderate and their duration was short, lasting 30 days or less. The incidence, severity, and duration of ISRs reported after touch-up and repeat treatments were generally lower than those reported after initial treatment.
Serious complications, while rare, can occur. The most critical risk is unintentional injection into a blood vessel (vascular occlusion), which can lead to severe issues like vision abnormalities, blindness, stroke, or skin necrosis. This is why our meticulous Juvederm injection technique always includes aspiration before injection and slow, controlled delivery. We are always prepared to manage such events, including having necessary supplies and protocols in place.
To further minimize risks and ensure a smooth recovery, we provide detailed preparation and aftercare instructions. For instance, avoiding aspirin and non-steroidal anti-inflammatory medications (NSAIDs) like Ibuprofen for a week or two before your appointment can reduce the chance of bruising. Some patients also find pre-treatment with Arnica tablets helpful. After your treatment, we recommend avoiding strenuous exercise, excessive sun or heat exposure, and alcohol consumption for the first 24 hours. Applying ice to the treated area can also significantly reduce swelling and bruising. You can find comprehensive guidance on what to do after your treatment on our Juvederm Aftercare and Juvederm Recovery Time pages.
All Juvederm products we use are FDA-approved, ensuring they meet rigorous safety and effectiveness standards. For specific details on FDA-approved indications for different Juvederm products, you can review official documentation: Scientific research on FDA-approved indications.
Frequently Asked Questions about Juvederm Methods
We often get excellent questions from our patients in Honolulu about their Juvederm treatments. Here are some of the most common ones we hear:
How long do the results of Juvederm typically last?
The longevity of Juvederm results varies depending on the specific product used, the area treated, your individual metabolism, and the Juvederm injection technique employed. Generally:
- Juvéderm Ultra & Ultra Plus typically last for approximately 6 to 12 months.
- Juvéderm Voluma™ XC is designed for longer-lasting results, often up to 18 months, and in some cases, even up to 2 years for mid-face volume correction.
- Juvéderm Volbella® XC and Juvéderm Volux™ XC usually last for about 1 year.
- SKINVIVE™ by JUVÉDERM® for cheek smoothness also shows results lasting up to 6-9 months.
These are averages, and individual results may vary. Many patients opt for touch-up injections within a year to maintain their desired look, which often requires a smaller amount of product.
How can I minimize bruising and swelling after my treatment?
Minimizing bruising and swelling is a common concern, and thankfully, there are several steps you can take:
- Before your appointment: If possible, avoid blood-thinning medications like aspirin, ibuprofen, naproxen (NSAIDs), and certain supplements (e.g., fish oil, Vitamin E) for 1-2 weeks prior, after consulting with your primary care physician. Some patients also find that taking Arnica tablets 1-2 days before and continuing for a few days after can help.
- During the treatment: We use fine-gauge needles or cannulas and apply a gentle Juvederm injection technique to reduce tissue trauma. The lidocaine in Juvederm XC products also helps.
- Immediately after: We apply ice packs to the treated areas to constrict blood vessels and reduce swelling.
- For the first 24 hours: Avoid strenuous exercise, excessive sun or heat exposure (like saunas or hot tubs), and alcohol consumption. These activities can increase blood flow and exacerbate swelling or bruising.
- For the first 12 hours: Avoid applying makeup to allow the injection sites to heal.
Following these guidelines diligently can significantly improve your recovery experience.
Who is the ideal candidate for Juvederm injections?
A good candidate for Juvederm injections is typically an adult over the age of 21 who is looking to:
- Restore lost facial volume
- Smooth moderate to severe wrinkles and folds (e.g., nasolabial folds, marionette lines)
- Improve facial contours (e.g., cheeks, jawline, lips)
- Improve skin smoothness and hydration (with SKINVIVE™)
- Has realistic expectations about the results.
However, Juvederm is not suitable for everyone. You should not receive Juvederm if you:
- Have severe allergies (especially a history of anaphylaxis) or multiple severe allergies.
- Are allergic to lidocaine or to Gram-positive bacterial proteins.
- Have an active skin infection or inflammation in the treatment area.
- Are pregnant or breastfeeding (safety has not been established).
During your consultation at Wellness OBGYN, we will thoroughly review your medical history and aesthetic goals to determine if Juvederm is the right choice for you, or if other treatments might be more appropriate.
Conclusion
The journey to a more refreshed and confident you often involves understanding the sophisticated science and precise artistry behind treatments like Juvederm. From the natural hydrating power of hyaluronic acid to the nuanced Juvederm injection technique required for each unique facial area, our approach at Wellness OBGYN in Honolulu is always rooted in expert knowledge and personalized care. We believe in empowering women through choices that improve their natural beauty and overall well-being.
Whether you’re looking to smooth wrinkles, restore lost volume, define your jawline, or simply improve your skin’s radiance, we are here to guide you through every step. Our commitment extends beyond aesthetics to holistic wellness, ensuring that every treatment contributes to your comprehensive health journey.